Overview
Applitools Root Cause Analysis (RCA) provides insights into the causes of visual mismatches reported by Applitools Eyes. When a test is run, Eyes stores the DOM and CSS that generated the checkpoint along with the checkpoint image, and when a baseline is saved Eyes stores the DOM and CSS along with the updated baseline image. In the Test Manager, when you view diffs between a baseline and checkpoint image, you can display differences between the checkpoint and baseline DOM and CSS information, and this can be helpful when trying to understand the cause of the visual difference. RCA is available in the Test editor, and on the Compare baseline page. For brevity we will refer to both of these tools as "the editor".
RCA is only available for DOM based web applications.
Viewing RCA
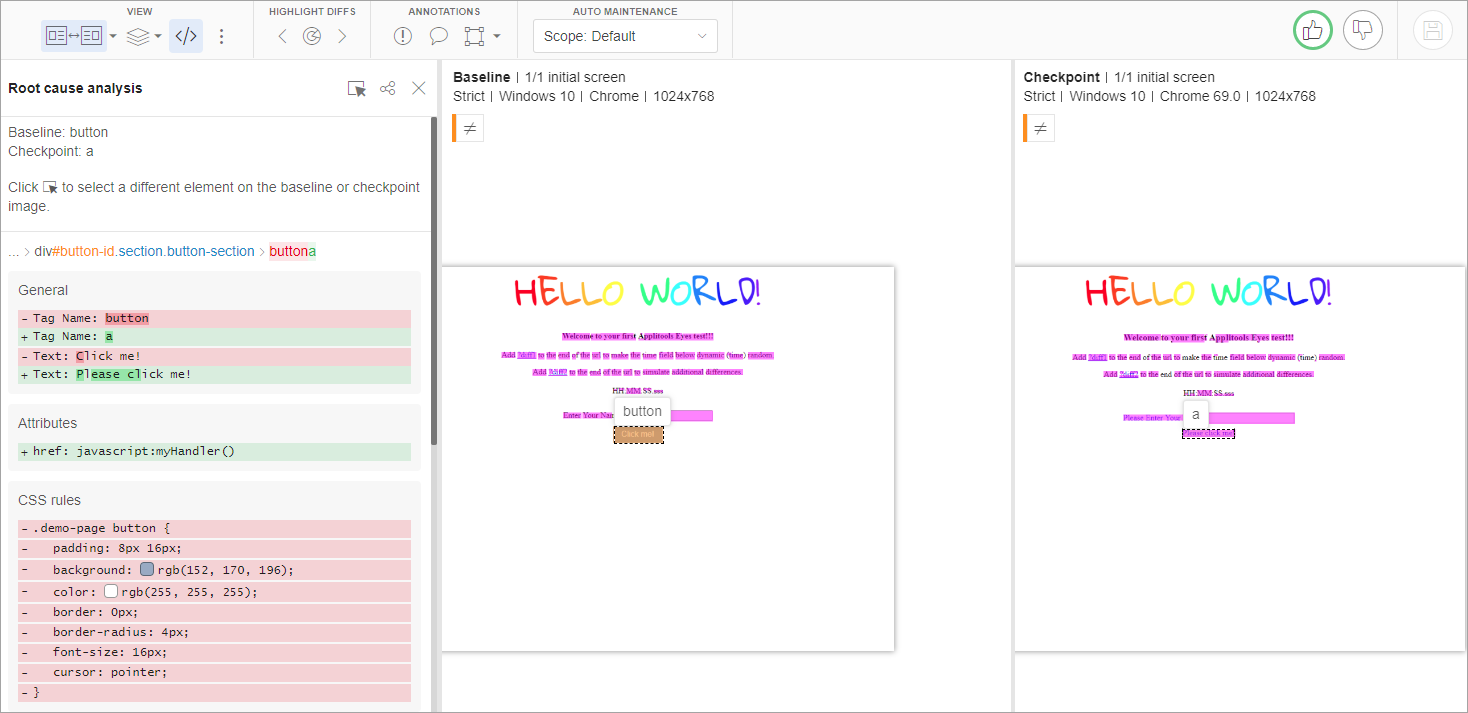
The editor displays RCA information when you click on a pink area that flags a visual difference in the checkpoint or baseline image panels (called here "diff"). The editor compares the DOM and CSS information stored with the images, and displays significant differences for any DOM elements that could impact the diff. RCA also allows you to manually select the elements whose DOM and CSS information will be compared. The following sections describe how to do this in detail,
Opening the RCA panel
Open the RCA panel by clicking on the  Root cause analysis button in the left toolbar..
If you see a message that indicates that DOM information is not available then proceed as described in the article Root cause analysis troubleshooting.
Viewing RCA by mismatch
- Click within the pink area indicating the diff, in either the checkpoint or the baseline image.
- The RCA panel displays the names of the baseline and checkpoint elements that overlay that area. It follows this with a list that consists of both these and other elements, that have DOM and CSS differences that may have caused the visual difference.
- If you click on a non-pink area, or if Eyes does not find relevant DOM elements, then an appropriate message is displayed in the RCA panel instead of the DOM and CSS information.
Viewing RCA by DOM element selection
- Click on the select element control
 at the top of the DOM diff panel, or use the SHIFT + E key combination.
 - Hover your mouse over the checkpoint or baseline image. As you do so, the editor highlights the bounding boxes of the element under the cursor. The editor highlight the content box in blue, the padding and border box in green and the margins in orange in the same way as is done in Chrome DevTools.
- When you click on the image, the editor highlights the current element and updates the RCA panel to reflect the differences between the newly selected element and the previously selected element in the other (baseline or checkpoint) image. The select element control is cleared
 . after you select the element, so to change the element, or select an element in the other window, click the control again.
The RCA panel
Initially the RCA panel displays a message that instructs you to click on a diff, i.e. on a pink area in the checkpoint or baseline images. After you have clicked a diff, the RCA panel displays a list of elements that may have impacted that diff. If you manually selected a checkpoint and/or baseline element, then the list of elements reflect the differences between the currently selected elements.
At the top of the panel you can see the tag names of the selected elements in the baseline and checkpoint and any ID and class information that is available :
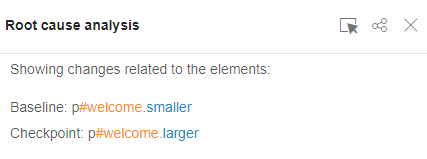
- Click on the element names to display the image for that element, zoomed in to that element. See Zoom in on the compared element for details.
- Hover over the name to see the full DOM path of the element and access a control to copy it to your copy/paste buffer, see Copying RCA information below.
- The checkpoint DOM path and any differences between that path and the path of the corresponding baseline element.
- A list of one or more DOM and CSS differences.
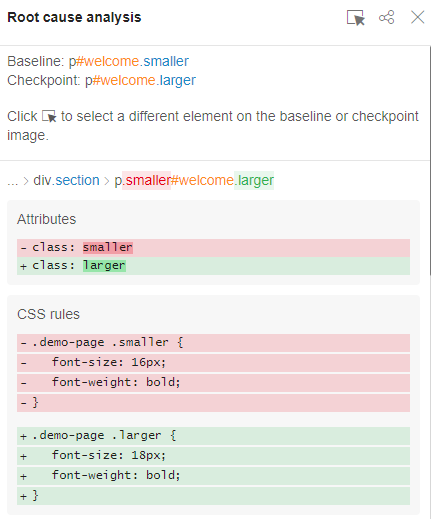
The color of the text or the text background indicates the differences between the checkpoint and the baseline. Values that are colored green were added in the checkpoint DOM with respect to the baseline DOM, and values colored red were removed from the checkpoint DOM. In some cases, values are displayed even though they are identical in the baseline and checkpoint (e.g. the element path, box dimensions, CSS Rules) - in these cases the values are not colored.
Types of DOM Differences
- Tag changes
-

- The element tag has changed from <button> in the baseline (red) to an <a> in the checkpoint (green). Unchanged IDs and classes are drawn in orange.
- Attribute changes
-
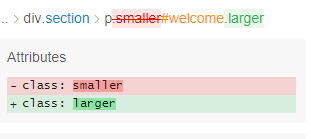
- In this example the class "smaller" in the baseline DOM has been replaced by the class "larger" in the checkpoint DOM. You can also see this in the attributes box, where the "-" in the red box indicates that the class was in the baseline and was removed from the checkpoint, and the "+" in the green box indicates that the "larger" class was added in the checkpoint. You can also see this in the element path where "smaller" is colored in red and crossed out and larger is colored green.
- Bounding box changes
-


- In the upper example the left coordinate is 854.5 in the baseline and 864.5 in the checkpoint, the top coordinate (17) is identical in both DOMs and the width and height are different (121.5 x 50 in the baseline, 111.5 x 40 in the checkpoint). In the bottom example only the width is different:
- CSS property changes.
-
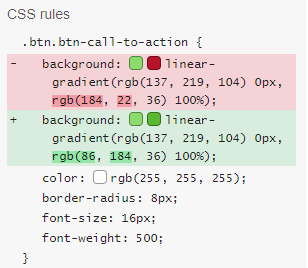
- In this example, the RCA panel indicates that the CSS background property in a CSS rule related to the selected element has changed. Note that when displaying CSS rules differences, the editor displays all the properties of the rule. The properties that are different are shaded in red or green, and the properties that are identical are shown unshaded.
- Textual change
-

- In this case, the text node of the element has changed (and become more polite !).
Zoom in on the compared element
If you click on the selected element name, at the top of the RCA panel, then the editor switches to the appropriate image window if it is not visible, and adjusts the zoom so that the element fills the window.
Identifying the elements being compared
To see the bounding boxes of DOM elements in the list, overlaid on the images, hover the mouse over an element in the list of DOM differences, as you do so, the editor overlays the checkpoint and baseline images with the bounding boxes of the element pointed to in the list.
Copying RCA information
To obtain a URL that will reproduce the RCA information currently shown in the editor, click on the Share RCA  control. The editor copies the URL to your clipboard and you can paste it anywhere convenient (e.g. a comment, issue, or email). When this URL is copied into the browser address bar, the relevant editor will open, displaying the step, selected elements and RCA information that were displayed when the URL was generated.
If you hover over the checkpoint or baseline element name at the top of the panel the full path name of the element will be displayed, and a copy control  will appear to the right of the name:

To copy the text of the full path of the element to the clipboard, click the  icon, you can then paste it into the editor comment or issue report or copy it to some other application such other an e-mail.
Close RCA panel
You can close the RCA panel by clicking on the  button at the top of the RCA panel, by clicking on the Show RCA button
  , toolbar, or by using the I shortcut key.